Tuesday, August 31, 2010

September kit

I have two layouts left to share with you and then I'm officially done with the September kit. I have plenty left over though, so will probably do at least a few cards with the remnants. I think we all had a lot of fun with this one, and as usual, I am eagerly anticipating what Gerri-anne has in store for us for October... but I digress. I hope that over the last month you've all become inspired to get your hands all inky with September's kit!

Wall Drug (2010 Vacation)
The Year of the Whoopsie-Do
Thanks for stopping by and don't forget, you can view all the DT work with this kit at Kit 'n Kaboodles Hall of Fame. Have a great week!

Sunday, August 29, 2010

Fun with September kit


I really loved the Kraft papers and that you could use as is or color them yourself. When I saw the main picture on this layout I loved the technicolor drum. The colors and the patterns just looked so fun! So I tried to mimic them for my layout. I cut the papers in strips and then spread them out and sprayed them with Glimmer Mist. I could have easily used Smooch Spray except I only have 2 colors ( a problem I intend to remedy soon ;) ) . Once the papers had dry I adhered them down onto my layout. I loved how it turned out. Simple yet effective!

Friday, August 27, 2010

I'm baaaack!!

The summer months can get pretty busy for me. I always do a lot of canning and freezing fresh food from the garden. I have put up about 50 quarts of green beans, 150 ears of corn, a few batches of blackberry and raspberry preserves, 30 some odd jars of peach salsa, some sliced peaches for cobblers, and some tomato juice. I am done for a little while until I go and get apples next month. Then I will be up to my eyeballs in applesauce and apple butter. I am so thankful to Gerri-anne and Sonia for letting me take a little break from my design team responsibilities for a few months, and for now letting me return with open arms!

I was so excited to receive my September kit, and I couldn't wait to jump right in and start creating. Here are a couple of layouts that I created.
I created the roses on this page using a technique I found on Stacy Cohen's blog. I just adapted a bit to suit my needs. I used pink bubble gum and candlelight glimmer mists on this page.
It's good to be back and creating again! Thanks for peeking at my pages and happy scrapping!

Monday, August 23, 2010

Two Down, One to Go....

Bear with girls, today's post isn't going as planned. I had a great altered box using some new Graphic 45 papers (way cool--kind of Tim Holtz-y fantasy, industrial revolution spin on them). However, here's where the snag is. My middle boy (Ben) left for college on Thursday (hence the title of this post). Hubby and youngest boy decided they needed to do the room rearranging this weekend to surprise me while I was doing groceries. Well, Rome wasn't built in a day, and it take more than a day to change around rooms. Peter is getting some of Ben's furniture and I am getting Ben's room for my new scrap~space.


My beautiful altered box, my camera, and a bunch of other items that I desperately need this week are currently somewhere in one of the piles or boxes in Ben's room (insert heavy sigh....) I can't even show you the before photo of what the room looks like right now, because my camera and cords are somewhere in that black hole. I spent a number of hours trying to organize and reorganize...and Gary says it will be a month before I am moved in. I am hoping to have it workable by the end of the weekend. Bear with me gals...you will see my Graphic 45 project really soon!

For those of you who have children going off to college or who have gone off recently--I am so happy that my boys have sprouted wings and flown away. I hope that I have taught them well, and given them the tools they need to be successful. It is their time to shine! I love them dearly, and they are still so much a part of our lives. However, it is time to move on, and I am truly blessed and one proud Mom.

Sunday, August 22, 2010

happy Sunday!


I was so excited to get the September Kit from KnK. First off I love Kraft papers! and the thoughts of black and kraft papers with splashes of colors was just so exciting. I used this image which I have to admit I did not recolor myself. My daughter Meagan's friend Liz redid it! I just loved the effects. They all wore Tie-Dye shirts for Sadie last year-the boys choosing 1 color and the girls choosing the other! Anyway I just love how this was re-colored and have been waiting for the "right" papers to highlight it. I thought these papers were it! I added splashes of color in the flowers made from the Crafty Chronicles that is included in the kit. I also glimmer misted the Petaloo Color Me Petals for the leaves. The colored letters are plain old white sticker letters that I colored with my Copics. Hope you have lots of fun scrapping this week. Don't forget Amy's Challenge here on the blog and for message board members there are a few challenges posted by Jules on the board

Friday, August 20, 2010

Spritz, Glimmer, and a Mid-Month Challenge

Have I ever been having fun with KnK's September kit! The uber-cool Krafty Collection from Paper Trunk just begs to be sprayed and colored with just about anything you can think of! With these layouts I used Smooch Spritz (which I am told will very soon be available in the KNK Shopping Mall) in Emerald and Glimmer Mist (already available) in Frosty Nights. Now, you can see that I may have gotten a bit carried away on this first one... see where my paper wrinkled? I didn't really take into consideration the weight of the paper, as I should have, before I started spraying. The Kraft papers aren't super-light, but they aren't as heavy as say, Bazzill might be. So if you've never really gotten acquainted with sprays and want to give it a try, keep this in mind before you start spritzing away on a favorite piece of paper! Especially if you are a perfectionist (which clearly I am not LOL) Here's a close-up of one of the fun flowers I made with the Crafty Chronicle...
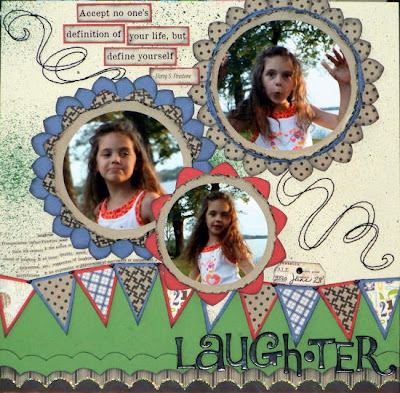
For this next layout I really wanted to think of a different way to showcase my photos. I happened to be looking through one of my old albums... an 8x8 one that I did when I first began scrapbooking. While most of the pages were filled with a picture, a title, and a couple stickers, one caught my eye in which I had taken a photo of my daughter and created a sunflower around it. I remember being particularly proud of that page, too! While it lacked any kind of technique or finesse, the idea itself was exactly what I was looking for. So instead of layering a bunch of different patterned papers behind my pictures, I made a template for two different flower petals and began tracing and cutting.... and tracing and cutting.... and tracing... and cutting...
... ok, yes it took forever to get them all cut out! But once I did the flowers went together pretty quickly. The only thing I would have done differently is to put my photos on after the flowers were assembled. I ended up with quite a few fingerprints on my photos.

The quote and dictionary text were both cut from the Crafty Chronicle, and I used a few of the Paperie die-cuts for the date-tag and in the banner at the bottom of the page.


So, I know you are all waiting with baited breath to see if I will have a mid-month challenge, aren't you? LOL If you're not, that's ok, if you are, here it is:
Go back through your old albums and recreate something. Not like scraplifting a whole page, but just some element on a page that you really loved then, and make it new with your experience and different techniques you've learned since. Clear as mud? And naturally, I want to see the "THEN" and the "NOW". Post a link to your pics in a comment to this post! You have til the first of the month. Happy scrapping :)

Wednesday, August 18, 2010

Fluffles was framed

I was picking through some paper that I got and found these wonderful journaling tags and decided to trim out the inside and frame Fluffles... I just adore this stamp.


I challenge you to look at journaling tags and see what else you can create with them...

Happy crafting.....Lynda

Monday, August 16, 2010

Altered States

Happy Monday!!!!
I just got back from a weekend with about 50 of my bestest scrappiest friends smack dab in the middle of Florida. A group of us gathered at an old historic hotel in Sebring FL (and YES it is haunted...and YES, lots of us have had close encounters of the creepiest kinds~~~FOR REAL!!!!!) for a weekend of scrapbooking fun. In addition to hanging out with our friends, being served yummy food by our hostesses Linda, Kathy, and Melanie, we were treated to classes by Lance Anderson from Rusty Pickle. He is a great guy, funny, talented, and puts together awesome classes. But, that is for another post.............(maybe).

I want to show you one of the projects that I put together using one of the great Kaiser Craft Beyond the Page album kits. This item contains wooden pieces that you alter and add photos to in order to create unique home decor items.


You can find lots of Kaiser Craft Beyond the Page items at Creativity Boutique!

Sunday, August 15, 2010

More fun with August kit


I loved the colors in this kit. such bright summer colors!!!!!!!!!!! and those cute cute cute pinwheels!!!!!!!!!!! and I absolutely love those corrugated letters!!!!!!!!Hope everyone is having a great summer.

Thursday, August 12, 2010

more layouts :)

sorry....my internet is having fiber optic issues (what is THAT?) So I am going to post fast and hope it goes through :)


here are two more layouts for the August kit!
this is two of my girlfriends and I relaxing. A little ;)

here is Kiley on her 9th birthday last year. Isnt she a little bit of a cutie??

Off to wait for the internet guy!

Wednesday, August 11, 2010

Altered frames are the perfect gift

Each year my girls work for hours on their gifts for their grandmother for her birthday... this year was no exception...they decided to create some frames for her to hold their end of the year school pictures. We bought some inexpensive white frames that were to be hung from ribbon and first painted them red (her favorite color). We then added a thin coat of varnish so it would be shiny... next came the dew drops for some texture.
They each then stamped the swirly image from the April Showers Flowers perfectly clear stamp set on either side of their picture. Here are the finished frames...I think they did a great job and they were a HUGE hit with Grammy!!

Happy crafting....Lynda

Tuesday, August 10, 2010

Summertime Photos

I believe that some of the most special memories of childhood are created in the summertime. This stands to reason; summer is full of vacations, family reunions, backyard BBQ's, and let's not forget Independence Day.... tons of events and fun experiences crammed into a few short months of the year! I know the day is coming when my children (my girls especially) decide that they don't want the camera constantly snapping around them, so I'm taking full advantage of their willingness now while I can. Our vacation this summer was full of colorful and memorable photo opportunities; little moments in their lives that I hope to help them remember by preserving the memories in pages of a scrapbook.


Two Peas in a Pod
The KNK August kit, full of bright colors and fun embellishments, is perfect for these summertime photos! For my double-page the warm golds and bright green worked perfectly for some pics of my girls in their Great-Aunt's gorgeous garden, drawing on the Marigolds and pea-pods in the photos. I added some red for a splash of contrasting color, and I couldn't resist adding some buttons and a couple of chipboard pea-pods from my stash to complete the page.

You and Little Lena
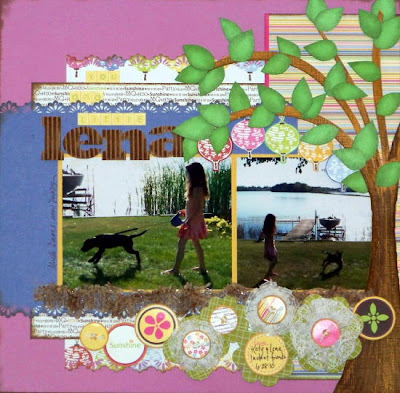
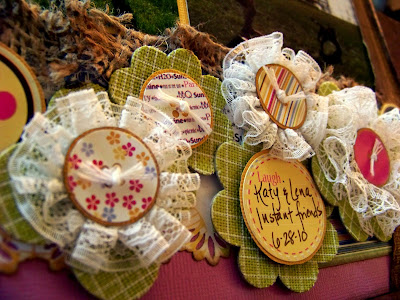
I am pretty sure that out of all the things we did and saw on our vacation, Katy will remember Little Lena the most. My Uncle brought this 10-week-old black Lab home the day after we got to their house and of course Katy fell in love with her right away! I had fun with this page, making some flowers from lace and, you can't see the huge tree in their backyard in the photos, so I decided to add one to the page.

And finally, as I usually do, I made a simple card from the last little bit of my favorite paper in the kit. I also had one pinwheel left so added it to the front with a sentiment sticker from the kit to make a cute friendship card.Have you scrapped any of your photos from this summer yet? Don't forget, KNK has a gallery, we'd love to see what you've been up to this summer! Have a great week :)

Sunday, August 8, 2010

more August Kit Love


I love the colors in this kit! and I have to admit both of my girls were fighting over the lantern included in the kit. So I put them to work and had them help me decide how to decorate it since they wanted it for their rooms. They decided on Color Me Flowers from Petaloo that are available in the add-on section. The opted for me to include bright colored buttons in the flower centers. Each flower is at a staggered height around the lantern. And then opted for some skinny ric-rac for the stems. I can't wait to see what everyone else does with their lanterns. I have a feeling we will be searching for more as both girls wnat to redo their rooms!

Thursday, August 5, 2010

Layouts from the August kit!

The August kits from Kit 'n Kaboodles are full of fun, summery papers and embellishments! My favorite item in the kit is the wonderful corrugated kraft alpha from Jillibean Soup. It can be left plain, or it can be inked or painted. In the first layout, I totally painted it, and then in the wall hanging, I lightly painted it. In future layouts, you will see it inked and left plain.


In the "you rock" layout, I wanted to highlight the gorgeous handmade pinwheels in the kit. I just used 2 different cardstocks, the alpha, the lace, and a pinwheel to create a clean and simple layout of my daughter Kiley.


I love creating things to decorate my house, and the papers are so fresh and summery, that I made a sign to hang on the black shutters of my kitchen. It is titled "celebrate summer" and uses the stickers from the add on kit as well as another pinwheel.
This is such an easy kit to create with, and I cannot wait to show you the rest of the things I made!

Wednesday, August 4, 2010

Life's a beach

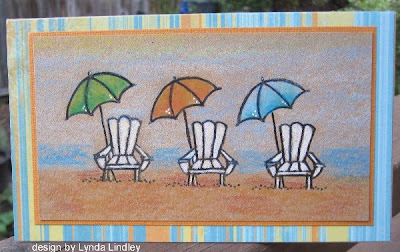
At least that is what the saying says....and this Stampendous stamp set says that to me...


I stamped the image of the chair from the Fun in the Sun set three times in brown Stazon ink. I then used my Prismacolor pencils to color in the images. I then mounted the stamped image onto Coredinations cardstock and then a piece of Kaiser Crafts pattern paper...


I hope the weather is wonderful where you are and you are enjoying some wonderful summer beach weather!
Happy crafting.....Lynda

Tuesday, August 3, 2010

Recycling is a girls best friend!

Are your girls looking for new, hip jewelry for back-to-school? Are they bored by the long, hot summer and looking for something fun to do? Well, here's a project that will get them glammed up and ready for school without breaking the budget!
Check around the house (or at a yard sale) or if you are desperate you can go to Walmart, Target and get some plain old dominoes. Decorate them with alcohol ink...you can use a felt applicator and blending solution if you want to experiment with the effects, or use a q-tip, or just apply and let dry. You will probably want to stay with lighter shades of colors.
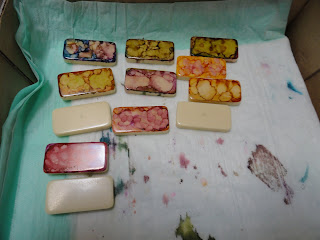


Next you need to pick some stamps that will fit on the dominoes. The images can 'hang off' the dominoes, or they can just be background images. You are going to use a permanent ink (like staz-on) to stamp the images onto the dominoes. Be careful--the ink should be dry ( I let mine dry overnight just to be certain) and also even though the ink is dry, your image may slip when you stamp it onto the domino.
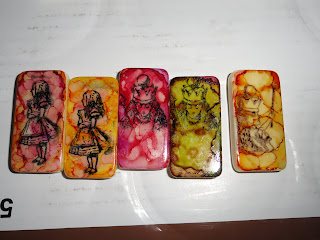


I used these amazing Alice in Wonderland stamps from TweetyJill. Creativity Boutique has some of the nature stamps and vintage stamps from TweetyJill (TJ) and some of their card kits and they are fantastic!!!!


Once you have your image stamped and are happy with the way it looks, take a metallic sharpie (they come in many awesome colors now...see)


and run it around the border of the domino so that it looks like you used metallic leafing. It will give it a beautiful finished look to it also.

For the finishing touch, you can turn it into a refridgerator magnet by putting a piece of magnetic tape on back or you can dazzle your friends by turning it into a beautiful necklace. Get a flatback bale from a place that sells jewelry findings


and glue it onto the back of the domino with some E6000. Now use some leather or other cording to make a chain and VOILA!!!!


Sunday, August 1, 2010

Some things on my wish list


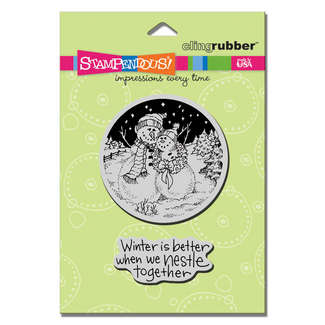
With CHA Summer done I am compiling my list of all the new products that are on my wish list. I really missed getting to see all the new product up and close this year...but the good thing is the manufacturers have been great about getting the product "out there" so we all can see it too. One of my past favorite booths was always Stampendous! Here a few of my favorites from their new releases...


I am loving these circle stamps! Gerrianne I hope you are listening and get these in at Creativity boutique!