Wednesday, March 31, 2010

Time for Spring Flowers!!!

I was ever so excited to design a card kit for the Creativity Boutique store and could not wait to create some beautiful things that would celebrate the arrival of spring flowers!!! Here are the details on my Spring Flowers kit:

4 sheets of pattern paper from the Bo Bunny Abbey Road collection:
* Bo Bunny Abbey Road Collection - Sky
* Bo Bunny Abbey Road Collection - DSot
* Bo Bunny Abbey road Collection - Stripe
* Bo Bunny Abbey Road Collection - Vine
5 sheets of Core'dinations cardstock in the following colors:
* Deep lagoon
* Lime
* Aqueduct
* Latte
* Scotch
Stampendous April Showers Flowers Perfectly Clear Stamps
Stampendous Pastel Blue Ultra Fine Glitter

you can pick up yours here for only $15.00...

here are the cards that you will get instructions for:

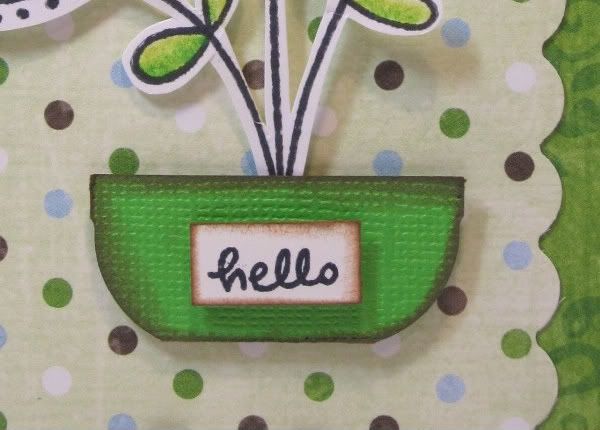
closeups of the cards:


here is a bonus card that I made with the leftovers from the kit...and there are a LOT of supplies left once you have made the four cards that I included instructions for:

Bonus card instructions:

For this card I first stamped my image onto white cardstock. I then used Prismacolor pencils to color in my image. I cut out the image using my small scallop edged decorative scissors. I then layered this onto two pieces of cardstock (lime and aqueduct). I covered my card front with a piece of the Bo Bunny Abbey Road DSot pattern paper. I then used some Helmar Zap Dots to mount my stamped image onto my card front.

I hope you'll take a peek at my card kit and the other kits designed by the other amazing designer at Creativity Boutique!!

Happy crafting....Lynda

Tuesday, March 30, 2010

More with KNK's April kit...

It may be snowing outside today, but KNK's April kit is all springtime and flowers! A much-needed diversion from the gloomy weather outside. Here's a peek at my reveal for tomorrow:
Be sure to check out the gallery to see the Design Team's amazing work with this beautiful kit!

Monday, March 29, 2010

Taste of the Orient

OMG----Creativity Boutique has some fantastic new oriental themed stamps in the store!! They lend themselves nicely for a technique called "painting with powders". Here are the supplies you will need to do this technique:
versamark pad, versamark pen, stamps, white/cream cardstock, embossing powders


Take your versamark pad and use it to ink a space approximately the size of your image. Cover it by sprinkling different colors (that compliment the papers for your finished project) on top of the ink you just laid. Create a design that is pleasing to you....then use your heat gun to set the embossing powder.


Now ink your image with versamark, and stamp it onto the background you just embossed. Sprinkle a dark ( I used bark) embossing powder over the image, dump off excess, and melt with heat gun.


Now, you are ready to add this to your card....VOILA!!!!

Sunday, March 28, 2010

Happily Ever After

I love all the variety of cards I can create with these stamps! SOOOO much fun! I thought this card would be perfect for weddings or even anniversaries. And once again I am experimenting with my copics! I was hoping to have a card kit to share with you... but all I can share is a picture since it has already sold out. It didn't even make it to Creativity Boutique as Gerrianne took it to a local crop she was hosting to show off and tease about the online card kits coming soon to Creativity Boutique!! but I can promise you that it will be worth the wait! I have seen the Card kits that the CB gals have created for you and WOW!!!!!!!!!!!!!!!!!!!

Saturday, March 27, 2010

Deb's April kit creations

The April KnK kit has been so much fun to work with! Not just because it is so beautiful, but also because I have been playing with a new toy...a Bosskut Gazelle! Determined to really learn how to use this thing, I sat down the other day and started playing.

For this page, I used the Gazelle to cut all of the loopy borders and flowers. On this page, I used the Gazelle to cut diamonds which I then folded in half over DMC floss to create the pendant banner across the page. I also cut the flowers with it too.I hope you all have a great weekend, and happy scrapping!

Friday, March 26, 2010

Playing Tag!

I hope you are all enjoying your Fridays. I am demoing at a large UK show for the first time in a couple of weeks so I am playing with tags at every available opportunity at the moment ... just to keep my hand in so to speak :0)
This is one of my favourite tags from yesterdays samples ... so much so ... I thought I would share the details with you.
1. I coloured the tag with Mustard Seed, then spritzed Wild Honey, Mustard Seed and Rusty Hinge distress ink with a mini mister on my craft mat and dabbed the tag in the colour ... drying between dabs with a heat gun until I was happy with the overall effect.
2. Then I placed one of Tim's stencils over one side of the tag and applied Brushed Corduroy distress ink. The easiest way to do this is to gently swirl the ink over the top of the stencil with a blending tool ... that way your mask should remain were you want it to.
3. I removed the mask and then stamped the flourish with crimson red acrylic paint and once again I dried it with a heat gun.
4. I stamped the text on some scrap card. Added a few Prima flowers that were also coloured using the same inks and coated with some Rock Candy stickles for added sparkle. Finally I added an Ideology charm and the tag was complete.
I hope you have a good weekend ... whatever you are doing ... see you next week!

Thursday, March 25, 2010

To Dye for...

Not too long ago, I wanted to dye some little 5"x5" canvas totes to use as gift bags and thank you presents but I was out of fabric dye which I find messy and not always dependable as to color intensity. I had read about using ink refills as a dye substitute and had been told by the Tattered Angels rep at CHA that she had sprayed Glimmer Mist on everything.

With this in mind, I turned our kitchen into a mini science lab and played happily the rest of the day.

These are the results:


This is what I learned:

1. Shake up the Glimmer Mist vigorously. You will get some bubbles but you are not going to be spraying the Mist, you are going to be pouring it.

2. The proportion I found worked best was 3 parts water to 1 part Glimmer Mist. If the color is too deep, add more water; if the color is too pale, add more Glimmer Mist.

3. While Glimmer Mist is water soluble, the stain it leaves on porcelain, stainless steel and some bowls is hard to scrub off. I used the lid to a take out salad container to mix my colors and soak the bags. When I was done with one color and ready for the next, I simply rinsed it out.

4. Use a wooden skewer to move the bags around to thoroughly saturate them or wear plastic gloves. If you do go "skinny dipping" in the mixture, Fantastik Heavy Duty cleaner is the best.

5. Fill the plastic container about 1/2 inch. This will be enough to soak one side of the tote at a time. Be sure to get the side seams, the handles inside and out and the inner rims of the openings. I let each side soak for about 2 minutes.

6. If the color is still too deep, simply use the spray hose on the sink to remove some of the color before it sets up.

7. Air dry the totes, checking the color from time to time. They can be redyed but the color will be deeper if you do.

8. Before you throw out the mixture, grab some ribbons, some netting, some flowers and some tags and dye them as well making sure the intensity of the color varies.

and Voila! Darling little totes filled with tags and decorated with matching or contrasting embellishments.

Currently, Glimmer Mist is on special at the Kit N Kaboodle store. The totes are available at most craft stores. Run don't walk and get some today. I would love to see what you come up with!

Wednesday, March 24, 2010

Signs of spring

Here in the Pacific Northwest we have had one of the mildest winters ever... I know that has not been the case elsewhere in the USA...but I have to say that the green has been showing all over the state for quite a while now...
This is one of my favorite seasons...second only to the Fall... the lush green textures and colors that appear as if overnight inspire me to pull out my colored pencils and stamps...
Well....here is a little sneaky peaky of what I've been working on for all the CB fans out there...

so...an early spring hello from me to you... I hope the colors of spring will inspire you and that you'll warm up to a crisp 68 soon too....that was our high here just outside Seattle today...not a typo either...really 68!!!
Happy crafting....Lynda

Monday, March 22, 2010

Tiny Wishes

I just came back from a day of playing with some of the KNK girls in Fort Myers. We had so much fun! One of the highlights for me was getting to see lots of the stamps and supplies that are carried in the Creative Boutique. BRAND NEW to the store are stamps by Penny Black ( I've loved her stamps for years). There are also lots of new STAMPENDOUS stamps, too!
Today's post is a little late in the day, because I am pooped from such a fun weekend. Here is your first peek at one of the newest sets in the store, it's called Tiny Wishes and has the most adorable hedgehogs!


I used papers from Daisy Bucket and copic markers to color most of the image. If you look at her lovely springtime hat, I used flock and smooch inks to give it some texture. Her sneakers also are trimmed with smooch inks! Those smooch inks have fine brushes, similar to nail polish, which makes it easy to color in small spaces. Of course, she needed a little blink (compliments of Kaiser).
Hope you like her!


Hope you like my little

Sunday, March 21, 2010

Thanks for rescuing me!

I am having so much fun playing with the Dragon Tower set from Stampendous! The possibilities seem endless! I made this thank you card using this set and the Princess Stamp. I used my copics to color in the images. I added some glitter to the princess because every princess needs a little glitter ;). Be sure to check out these stamps!

I also wanted to share one of my layouts with the April KnK kit! I just love Prima papers!!!!!!!!!! and I can't get enough of those COLOR ME CRAZY flowers that were in March kit! The ones on this layout were sprayed with glimmer mist!

Saturday, March 20, 2010

Finally, the news that you have been waiting for!

The BUNNY HOP CROP winners!

Since everyone did an amazing job on all the layouts, we just couldn't pick one winner for all the challenges, we decided to to overall crop winners. You will receive a gody bag in your next shipment!

First place winner-Laura
Second place winner- Penny
Third place winner-Chelle

Sorry for the delay in announcing the winners, but having to kidnap and take care of Sonia so that you could all have a great sale was EXHAUSTING. ;)

Thursday, March 18, 2010

Introducing the April KnK kit


And it is chocked full of yoummy Spring time treats: papers by Prima, Little Yellow Bicycle, and Bo Bunny, fabric tags, lace, glimmer and glam and some rub ons too. This kit almost scraps itself. Hope you enjoy it. Oh, and did I mention that more of the beautiful Prima papers are available in the store? Better hurry before I buy them all out! And the add on for this kit? Oooh La La! Check it out.


Happy Spring,
Jules

Tuesday, March 16, 2010

March kit creations and an easy canvas technique

So, I have a confession to make. I'm not much of a mixed media/altered art type of person. I like to stay in my comfort zone and stick with what I know how to do. That being said, when I got my March kit and it had the 12x12 sheet of self adhesive canvas, I said to myself, "What in the world am I going to do with this?" So, I just sort of laid it to the side, created two layouts and a card, and was working on my third layout when I noticed that canvas, still staring at me, begging to be used in some creative way that I couldn't fathom.

Then it hit me! I wanted to mat the picture on my layout with white cardstock, but I could mat it on the canvas! Then I could fray the edges, giving it a worn fabric look! It was my a-ha moment! Something mildly creative (for me, anyway) and super simple to do! Here's a little close up shot for you: And here's the whole page:Here is another layout I created with the March kit. This one was made for Laura's challenge to scraplift one of her layouts. This is my page:And this is Laura's page:
Thank you, my friend, for your amazing inspiration! Happy scrapping to everyone!

Monday, March 15, 2010

I can hardly 'contain' myself!!!!


Have you seen the pails acrylic paint buckets in the store and have no idea what to do with them? I picked one up the other day and immediately thought Easter bucket! I picked out some of Chatterbox Fabulous Flocked Blossoms paper and some complementing colors of cardstock (purple and teal), Class A-peel stickers (Jumbo Eggs, holographic violet), and some absolutely adorable Easter stamps from Stampendous ( Chick Ears for the lid, and Funny Bunny for the main images). To make the bunnies even more adorable, I turned them into fabulous flocked bunnies!


All you need to do is to add Easter grass and fill it up with special treats!

Sunday, March 14, 2010

Knights and Princesses and dragons oh my!


I fell in love with these stamps! Originally they were available in mounted wood stamps only. But now Stampendous! has put them out in a set of cling rubber! So you get the stamp and the greeting in one package! YEAH! and Creativity Boutique has this and many others! I used Copics to color the images and added a touch of glitter to the princess dress! They have many more stamps to round out this set including a dragon/tower set! Oh and how about a tiny sneak peek of another kit that may be coming your way very soon!

Saturday, March 13, 2010

Member's Challenge: Scraplift!

I love it when an unexpected challenge crops up! It came just in time for me, as my mojo had been on the fritz for a couple of days and we had also just finished up an online crop. Usually there's a little lull in the action on the message board right after a crop, and this time was no exception. So long-time member Laura B. took matters into her own hands and issued a challenge of her own! I am so glad she did, it was just the jump-start I needed, so thanks Laura!!
The challenge was to find one of her own layouts in the gallery and scraplift it. I chose this cute layout of her adorable pooch Max, it just called to me! I love the multi-photo design and the journaling around the photos.
"Max" I had some Bisous PDQ papers in my stash that I thought of instantly when I saw Laura's layout of Max. Here's my take:
"Love My Goofy Girls"
My paper was a little too busy to add my journaling around the photos, but I kinda felt like these photos (along with the title) really spoke for themselves anyway so I chose to omit it. Thanks for the challenge Laura!

Friday, March 12, 2010

A sneak sneak peek!

Evening Kaboodlers ... actually it is evening this side of the pond ... I am not entirely sure what time of day it is on your side ... so maybe Hello is a safer bet :0) I am under strict orders from the lovely Chris ... who is n't actually that strict at all ... but I am going for effect here ... that I am only allowed to show you a sneak sneak peek of  a sizzler of a kit that may be coming to a store not too far from here very soon :0) Are you excited??? I am! I am hoping to be able to tell you a lot more by next week ... so watch this space :0)

Thursday, March 11, 2010

More fun homemade Flowers!


Who doesn't love to make their own flowers for cards and layouts and mini albums? I know I do and when I find a new technique, I love to share it! This one that I found at Fancy Pants online blog was done by Jolene Pienaar and I love it! She made these little spiral flowers and they are so easy to do. On her directions, she had you cut a circle out and then draw a spiral on it, cutting with either straight or scalloped scissors. Once you cut your spiral out, she rolled it from the center and her flowers came out gorgeous! I found that I did better by not drawing a spiral on my circle but by just cutting into it, going around and around until I got to the center. Using scalloped scissors makes them even prettier too. Once done, you push it down in the middle and tack it down or glue it. You can also use paint or ink for the edges to embellish it a bit more. Here's a close up of some of my spiral flowers.


You can use cardstock or printed papers, whatever you like and the bigger the circle you cut out, the larger the spiral flower.
Have some fun with these and let us know how yours come out!

Wednesday, March 10, 2010

Decorative scissors tips


So...some of you have come clean and confessed to having a collection of scissors much like mine....so I thought I would share with you some tips to keeping your scissors working in top condition. Many of these tips I learned while becoming a certified Fiskars demonstrator; so they work for straight as well as decorative scissors.

The most important tip is to keep your scissors clean. When you are cutting your scissors will collect small paper pieces and lint; simply wipe your scissors blade clean with a lint-free cloth when you are done cutting. You can even clean and condition your scissors with household oil; you wipe the blade down with the oil and then clean it with a cloth. You'll want to cut through a few pieces of scrap paper to ensure you removed all the oil from the blade before starting your next project.

The next tip is how you can keep your scissors cutting well....this one requires cutting every so often through wax paper and aluminum foil. This works for both types of scissors (and all those punches you know you are hoarding too). I cut through foil after I have used my scissors a lot and this helps to keep them fresh and cutting like new.

Never force your scissors to cut through paper. Certain types of cardstock and even some heavy weight pattern paper is just too thick for decorator scissors to cut through. If you have to strain your hands while cutting you risk damaging your scissors.

The most important tip is that you get what you pay for...don't be surprised if that pair of scallop scissors you picked up in the $1 spot at Target don't cut anything at all! My recommendation is to save those coupons that are in the Sunday paper and stick with the brand name decorator scissors; you won't be sorry.

I hope you found these tips helpful and pull out those scissors and tune them up for some Spring Training!!

Happy crafting.....Lynda

Tuesday, March 9, 2010

The crop is over.....BUT....

but you can still upload challenges until midnight EST! Look at one of the amazing layouts that we found on the site....

please join us!

Monday, March 8, 2010

Take out those dusty punches!!!

We have been talking about tools that we had to have, but somehow ave found their way to the back of the crafting closet. My poor husband cringes every time I come back from scrappy-crap shopping (as he lovingly calls it), and he checks to see what new punch I have gotten for my collection! I have an entire cabinet filled with punches, and use many of them in my crafting. How many do you have? How many are you using? With Easter on the horizon, I thought that I would show you an adorable "wascally wabbit" that I made using some of my basic punches. All you need is some pink and white cardstock and some punches....


and you can make this adorable rabbit to use as an embellishment for a card or layout!


Watch the KNK message board for more ideas using all kinds of punches!

Sunday, March 7, 2010

Loving these Petaloo Flowers

Love these flowrs that are in KnK's March kit! The new Color Me Crazy Flowers from Petaloo! Love love love that you can ink them, stamp on them, glimmer them....so much fun!!!!!!!!!! Don't forget to play in our BLOG HOP ...see the post below for all the info!!!!!! and cropper you have until Tuesday to complete all your challenges for the Crop! Forgot to mention....Watch for some exciting news from the Creativity Boutique Team!!!!

Saturday, March 6, 2010

It's Crop time!!


Or I should say... it's HOP time!!! To kick off today's Bunny Hop Crop at Kit 'n Kaboodles/Creativity Boutique (yes, we are sooo ready for Spring, aren't you?!), we're having a blog hop! It's only fitting, don't you think? Here's how this one is going to work:


Each design team member is going to post to their blogs today, and somewhere within each post will be a word in italics. Find the word, write it down, and build a sentence as you hop through each blog. Make sure you go in order! The hop starts here, at the Kreative Kaboodles blog, so your first italic word will be within this post somewhere! Once you have your sentence completed, send me (Amy) an email (or a private message for message board members) with your completed sentence! I'll have a random drawing of those who have completed the sentence correctly for a chance at an extra crop prize! How easy is that?


So what are you waiting for!! Let's get Hoppin'!! The next stop in the hop is Chris, make sure you visit her next. Have fun, and see you at the crop!

Friday, March 5, 2010

Crafty Eye Candy!

 
I am busy busy busy today getting ready for the online crop tomorrow! Us Creativity Boutique teamies have a little surprise up our sleeves. So I wracked my brain and tried really hard to think of something pretty you could all look at! 
After 2 seconds I settled on Lord Tim of Holtz :0)
Check out the Timmy stuff they sell right here ... so cool!
OK ... back to work for me ... don't forget to join us tomorrow :0)


Thursday, March 4, 2010

March Kit Creations

Kudos to my fellow KnK design team member, Amy, for designing this month's gorgeous kit! This is my first experience with Shabby Green Door products, and I can definitely say that it won't be my last. I am in love! Here's a layout and a card that I whipped up with this kit:I created the layered flower by spraying the different layers with glimmer mist. I punched butterflies out of the transparent sheet music paper and used the beads as the body of the butterfly. I sort of draped the rest of the beads around the picture, creating a butterfly trail.I did a little cut work for this card, and I stamped the sentiment across the banner. I used glimmer mist again on the flower. That's it for me today! I hope you all have a great day! Happy scrapping!