Sunday, February 28, 2010

KnK's March Kit is awesome


Hi thought I would offer you a sneaky peek of one of my projects for KnK. I also used these stamps


from 7 Gypsies which are still available at Creativity Boutique and KnK. I thought they match so well with the kit. Hope you have had a great weekend! Don't Forget the KnK/Creativity Boutique crop Next saturday at KnK's Scrapbook Cafe! ohhhhh and just wait til you see the secret projects the Creativity Boutique girls are working on!!!!!!!!!!!! shhhhh its top secret!

Saturday, February 27, 2010

HAVE YOU EVER THOUGHT...

About the history of our country both good and bad. events you have witnessed and how you felt when these events occurred. Did you scrap them? I would venture to say most of us did not. I know I did not even think of it until 9-11.

Many of us remember the day John F. Kennedy was assassinated. You remember exactly where you were and what you were doing. On 9-11 we all know where we were and what our feelings and fears were as the travesty unfolded. These events were tragedies in our nations history.

Now what about the great things. As I have watched our young athlete's in the 2010 Winter Olympics how can you not be proud. These young people and their families have given up so much. They have done this not just for themselves, but to bring honor to our country, the UNITED STATES OF AMERICA.

Now about that scrapbook, I have chosen to put these events and others in a separate scrapbook. I will put the good and the tragic, I will journal my feelings and reactions to these to the events of our life and country. Now you say "they will learn that in school" true they will. The question is will it mean as much to your children, grandchildren or great grandchildren reading it in your words and feelings. They will realize you were there when this all happened.

These are just thoughts from me to you. All of us experience and see remarkable things in our life. Remember when Neil Armstrong walked on the moon? Our children take that as a normal event. Most of us could tell them different when it all began.

Most of all remember to ; LIVE, LAUGH, LOVE AND SCRAP IT ALL!

Until next time, Barb


Friday, February 26, 2010

Life's a bowl of cherries!

 
I love that expression ... which means I love that stamp... and I adore the little cherries. This is an upcycled card coaster ... the type you get in British pubs ... I think you get them in the U.S too ... if not any chip will do nicely and it is great fun to play with.
I have coloured this particular piece with Aged Mahoghany Distress ink ... and lots of Grunge paper!

I actually made this in the back end of last year ... so Why am I showing it now? ... well it was for a challenge on an Online crop over at the Kit 'n' Kaboodles scrapbook cafe ... and there is another one on Saturday the 6th March 2010 ... it is such good fun ... I thought you may like to sign up and join in!
If you do ... well just click here and you are half way there already :0)
Have a good weekend everyone ... see you same time ... same place ... next week!

Thursday, February 25, 2010

JOIN US!!!

March 6th is going to be SO much fun at http://www.knkclub.com/!! We are having a crop that will feature FUN, scrapping, stamping and PRIZES! Make sure you come and join the 2 Design Teams, as we have planned a very fun filled day for you!!!


Wednesday, February 24, 2010

Hap-bee birthday

As a followup to my post from last week where I challenged you to pull out your deco scissors and get busy....this week I am going to tell you how you can get the look of those fancy border punches, but with the scissors you probably already have in your drawer!

And....because I just can't seem to get enough of the Sprinklin Love Bee Cling Rubber Stamp by Stampendous....here he is again!!

So...first you'll need a pair of scallop scissors and a small hole punch...you then scallop edge your cardstock on all four sides. Then, take your hole punch and punch a hole inside each scallop; this will create that great border that you can get with those border punches... I find that drawing a line on the back of my cardstock helps to keep the holes aligned.


I stamped my little pal and colored him in with Prismacolor pencils...cut him out and popped him up on some new Helmar Zap Dots... I then printed my sentiment onto cardstock and cut it out...added the Prima flower and and here is my final card....


Stamp: Sprinklin Love Bee Cling Rubber Stamp by Stampendous, Cardstock: Coredinations; Flower: Prima; Scallop scissors: Fiskars; Color pencils: Prismacolor

I hope you'll give creating your own borders using your scallop scissors and a hole punch...be sure to link it up so we can take a peek!!

Happy crafting....Lynda

Tuesday, February 23, 2010

It was worth the wait!


One of the only downsides to having the latest and greatest products in our kits is sometimes the product are so new that we can't get them as soon as we want them! Such was the case with our latest kit... these amazing papers from Shabby Green Door (a new division of Daisy Bucket) were such a hit that they had to go back to the printing press to fill all the orders! Luckily our order was placed early enough that we were able to get them in time to bring them to you in our March kit. We are one of the first kit companies to bring you the "On the Wings of a Dream" collection, which is shabby, vintage, and full of gorgeous colors in soft shades of blue, pink, cream, and brown. I finally got my hands on the papers last Friday and they are exquisite! Three of the papers are featured in the main kit and all the rest are available to add to your kit, in addition to fabric Stitchits, a vintage background stamp, and lots of other beautifully coordinated embellishments. I am so inspired! Visit our gallery to see what the Design Team creates with this kit, and check out the Shopping Mall to see the kit and add-ons in their entirety. You're going to love it!

Monday, February 22, 2010

Here Come the Chicks!!!


Easter is just around the corner (yes...it is!) and Stampendous has the most adorable chicks out there! I used the stamp set called Chick Ears to make panels for this coaster box. You can use this easy to make box for a desktop accessory, a gift for someone special or even a little Easter basket to give to a friend or co-worker. Ready to Hop-on-board and learn how to make one???

To make this project, you will need the following items:
5 chipboard coasters (I used 4x4 size)--you can get these from your favorite restaurant
patterned paper to cover the coasters ( you choose if you want to cover both sides or just one), crop-a-dile or sturdy hole punch, ribbon, stamps, ink, coloring tools for the images, adhesive, paper cutter, any embellishments you would like to add on


1. Choose 2-4 different papers/cardstock and cover your coasters. It is fine to cover just one side, but some people like to cover both sides. For this box, I only covered one side. The flower paper is from Chatterbox and is flocked! It is called fabulous flocked blossoms and is available in Creativity Boutique. I also picked 2 shades of coredinations cardstock to complement it.
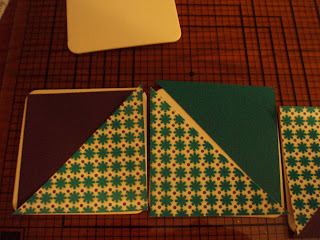


Cut your cardstock/patterned paper into 4x4 squares. I cut each square on the diagonal before glueing it onto a coaster. To pick up the yellow in the flocked paper, I used a similar shade of ribbon to decorate the coaster, too.

2. Once all 5 of your coasters have been adorned with the patterned paper, you will need to tidy up the edges. I did so with Tim Holtz's fabulous sander (also available at Creativity Boutique). For this project, I didn't feel the need to ink the edges of the coasters, as they would be hidden. If you really must, go for it! It won't hurt...

3. Lay all of your coasters out and arrange them for assembling into a box. Decide which edges you want together, and punch holes for your ribbon bows. Think this over, and punch 2 coasters at a time...so that your holes match up! I punched 3 holes on adjoining sides of the coasters. If you choose to lace the coasters together in a different manner, that is not a problem. The hardest part of this is making sure your holes match up :)
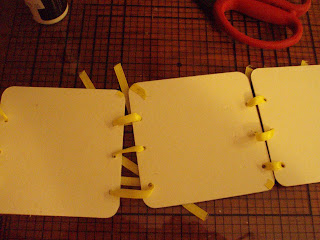


4. Run lengths of ribbon through the holes so that you can build your box. There is no correct way to do this....whatever works for you! I built the sides up, and then glued the bottom onto the box.
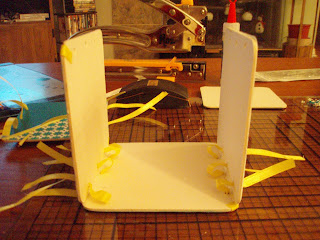


Once I had 2 sides together and was happy with their positioning, I glued them together so they became fixed. The glue will dry clear, making your box more stable.


5. Stamp your images onto white cardstock, color then mount onto coordinating cardstock ( I used scraps from the rest of the project). I used yellow flocking on the chicks to make them fluffy. Attach the stamped image to the side of the box.

6. Here is the box completely assembled. I tied square knots with each bow and trimmed them close to the box.


7. You are now ready to fill your basket with goodies...you can fill it with anything you like!

Sunday, February 21, 2010

one more Love card....


I know Valentine's day is over, but I really love making Love Cards... They can be used to give to your sweatheart any time during the year and even substitute for a quick anniversary card.
Have you seen the latest KnK kit??????? It is gorgeous! featuring the Shabby Green Door! and the new stampable, colorable flowers! YOU NEED THIS KIT!!! :D Hope everyone has a great weekend! and don't forget KnK has a crop coming up on March 6th!


Friday, February 19, 2010

Play Time!


Hello everyone.
Does this look a bit odd to you? Bare with me and all will be revealed.
Firstly I got a really really big manila tag and I blended Antique Linen; Fired Brick and Spiced Marmalade Distress Inks onto it.
Then I spritzed it with water ... stamped it with water ... then stamped it with a Coffee coloured ink. The stamp I used was the Stampendous Agapanthus.


I know ... I know ... it still looks odd ... but stay with me. I used a one inch square punch to punch random one inch squares from my tag. I say random ... I made sure some had a stamped image and some did n't. Then I mounted all nine on a 6"X6" card blank.


Hopefully you don't think it looks odd now. This took about 10 minutes in total and it makes a great note card ... alternatively ... add a greeting or a 3d butterfly and you have a lovely greetings card too.
Have a great weekend everyone ... I am off to see Sir Tim of Holtz so I just know mine is gonna be great :0)

Thursday, February 18, 2010

Spring is in the air

When the weather chills our bones in the winter and we think that icky white stuff is never going to stop covering the ground, our thoughts (at least mine) turn to Spring with its promises of mild, sunny days and gardens beginning to flower.

This is just what happened to me this past week when we were experiencing still another gloomy and cold winter day. In an attempt to bring some sunshine into my day, I decided to make gift bags and tags for friends. These are the result. Rather than using a fabric dye on the 4x4 canvas totes, I used diluted Glimmer Mist and/or Adirondack and 7 Gypsies' color washes. I prepared my mixes until I got just the light springy colors I wanted and soaked the bags. If the color became too deep or dark, a simple spraying from my kitchen nozzle changed that easily.

I also dyed tulle, tags, lace and ribbons at the same time and used hand made and pre made flowers. I stamped on one and highlighted the stamped image with metallic inks. I hope my friends will enjoy these gifts made with love.


Wednesday, February 17, 2010

Dig them out...I know you have them...

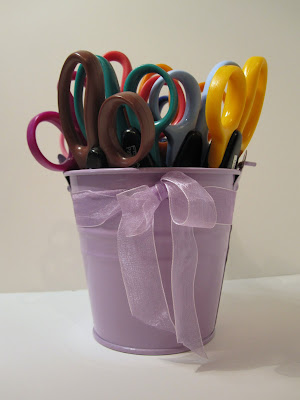
So the design team has been coming up with ideas that challenge you to dig out tools that you may have sitting around and put them back in action...so my challenge to you is to pull out those deco scissors...you know you have a few pair...probably a pile of them like I do:


and get busy using them. For my card I thought I would show you the changes that can happen is you add a little snip here and there with your deco scissors...
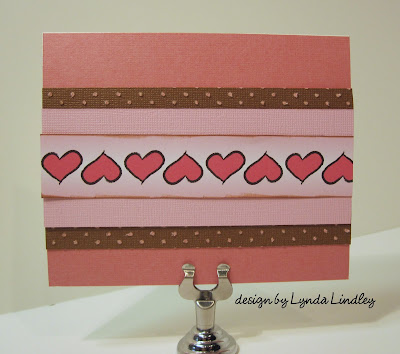
First here is my card with no fancy cuts at all:


ThenI pulled out my ripple scissors and cut the pink strip:


I then used the same scissors to cut the brown strip too:


I added a rubon to the bottom and then put some crystal laquer on the hearts so they are shiny:


For this card I lined up strip that were cut with the scallop scissors to create this fun bottom for my card:

So...what are you waiting for...dust off those deco scissors and put them back in the lineup!! I hope you'll join in the fun on the message board as we look to revive a few of your less used tools!
Both cards featured Core'dinations cardstock and Pattern Paper by Nikki Silvis!
Happy crafting....Lynda

Tuesday, February 16, 2010

Thinking "Out of the Box"

Sometimes I get inspiration from the funniest things, out of no where. I was walking through Michael's and saw a whole pack of gift bags with handles. There must have been 15 bags in the bundle.

I immediately thought to myself, MINI ALBUM!! I imagined keeping the front and back page with the handles on and cutting the handles off the middle bags. So I brought them with me recently to a weekend crop and started working on them. It's a work in progress but I wanted to show you what I've come up with so far...those empty bags have become this...


I found scrapbook paper pack called "Vintage Collage Stack" also at Michael's and I did a lot of precise cutting out of images for the bags plus liberally used Prima flowers and lots of Tim Holtz inks. The backs, where I will be putting my pictures are looking like these..

I'm not sure how I'm going to attach it all at this point or if I will use the inside of the bags as well but as I said, it's a work in progress.
I just wanted to show you that you don't have to always spend a lot of money buying an album and can sometimes find some objects in stores that you can alter into something very useable and pretty. I'll show you it when I finish it so you can see how it turned out! Just do a little thinking outside the box!

Monday, February 15, 2010

Happy Birthday!

Hieveryone!
Last week I showed you how to make adorable embellishments from bottle caps. Here is a card that I made for a friend at work. Notice the bottle cap on it? I made it myself to match the patterned paper I used in the card. This card is made with the September KNK kit and stamps from Stampendous. All items are available in the Creativity Boutique store! The sentiment reads 'We all know that birthday calories don't count'

Did you know that the KNK monthly kits are fantastic for card-making? The papers, cardstock and embellishments are all coordinated to work together. Next time you are ready to make some cards, pull one out of your stash and get creating! They are not just for scrapbooking.


Posted by Picasa

Sunday, February 14, 2010

So You


I really loved this picture of Meagan from last spring. We were in the middle of a graduation day photo shoot and she decided to start making faces at the tree. Silly girl! I used the February Kit from KNK for this layout! I think this may be the first time I ever used grey as a background. I really like it! I used the Smooch to color in the stamped butterfly. Don't forget to try my challenge from last week.

Saturday, February 13, 2010

"Ten Minute Layouts"

Like almost every scrap booker I know, I love to spend lots of time on
every layout making sure everything is just perfect, that I've been as
creative as possible and going so far as to make lots of my own
embellishments and titles. But, there are times when I just want to
get the layout finished and in its album. I still want it to showcase
the photo or photos but I really don't want to spend hours and hours
to do so.

I use a simple formula for ten minute layouts. First, I use premade
stickers or letters for my titles. Second, I stick to some pretty
basic shapes: rectangles, squares, circles. Third, I use hand
journaling rather than computer generated. Fourth, I use premade
embellishments such as flowers, journal tags and photo mats. And
lastly, I try to put a bit of a twist into each layout: In the "Just
Jack" layout, I repurposed the journal cirlcles to create an attention
getting border, in the "You Crack Me Up" layout, I slanted everything
and in the "Rob" layout, I journaled around the circles, up and over
and down the photo. In the "Peek a Boo" layout, I used the paper left
over from cutting out a circle.

Four layouts in about forty minutes and I am pleased with them all.

Jules Eickmeier


Friday, February 12, 2010

More Projects and the Winner!

Just a quick post from me today .... 
Firstly the winner of my little competition last week was

LME said...
Not sure but have you used the bind it all to make the holes for the ribbon?
LME guessed correctly that I used the Bind it all to make the holes for the ribbon at the bottom of the tag.  I will contact you in the next day or so to arrange for your prize to be shipped to you. 
Finally promised here are a couple of other unusual ideas for using your Bind it all.
The first one is a box made from beer mats ... the beer mats are the perfect size for just one set of holes down each side which can then be joined with ribbon.
 
The second project is made from upcycled CDs ... these go through the Bind it all so easily and make a great little journal book or home decor piece.
Well that is me for now ... Have a great weekend.

Wednesday, February 10, 2010

Last minute valentine....

If you're like me...you probably took care of getting your kiddos all ready for Valentines day and put your own off till the last minute....guilty!!

I sat looking at this cute sentiment stamp by Stampendous trying to decide what to do with it when I doodled a heart shape...then cut it out...then cut out one that was a little larger from a different color paper...

I then stamped the sentiment into the center of my small heart shape... now what...??? I decided that what I really wanted was some polka dot paper to put it on...but didn't have any that would work, so I pulled out my small circle punch and got busy making my own polkadot cardstock paper for my card. Adding my polkadots to a piece of double sided Coredinations cardstock.
I then pulled out some scallop sissors to trim it down...added another piece of cardstock behind it and then mounted the whole thing to my card base.
Finally, I added an arrow that I cut from a scrap of the same brown Coredinations cardstock to the heart and mounted it to the front of my card using foam tape!


So now I'm set...my final Valentine that I needed to make....I think he'll like it!
Happy crafting....Lynda

Tuesday, February 9, 2010

February Ad Challenge!

Inspiration can come from all kinds of different places, even advertisements. An ad challenge is to create a layout based on the design of the chosen ad. I found this one in Family Fun Magazine:This can easily be adapted to a 12x12, remain 81/2x11, or even a card. I chose to create a 12x12:
What can you do with this? Post a link to your creation in a comment to this post (or in the challenges forum for KnK message board members), and at the end of the month I'll will draw for a RAK. Have fun with it!

Sunday, February 7, 2010

OMG~~OMG~~OMG what a tip I have for you!!!!

The other day I was surfing for ideas and found an amazing one. Do you love those decorative bottle caps that are used as embellishments?I do but they are so very pricey, I hardly use them. About a year ago, I learned how to make my own, but it involved a lot of hammering and loud noise (not fun). Well, here is a super easy, quiet way to crunch bottle caps (and you can do up to 15 at a time!!!).
A few weeks ago my hubby and I were in a local produce store and I saw this bag of bottle caps in the home brew section (you know, where you can make your own beer).
I saw the price and had to get them (insert photo of hubby rolling his eyes)


Now comes the fun part...get out your Big Shot (or similar machine). Place the first acrylic pad on the platform. Arrange up to 15 bottle caps, upside down so the sharp edge is facing up) on the pad, then cover with the 2nd acrylic pad.


Now run this through the bigshot...


and you are going to do the happy dance when you take off the top acrylic pad~~you have smooth topped bottle caps that are soooooo ready to be decorated for you to use on layouts, cards, and any other papercrafting project you come up with~


To decorate, use a 1" circle punch to cut paper that coordinates with your project.


Adhere it to the inside of the bottle cap with glossy accents. Cover the paper with glossy accents to seal. Be careful that you don't get airbubbles (you can use a paper piercer to break the bubbles if you have any). Set aside to dry overnight...


When it dries, it will look like this (yes, this is different paper but it was already dry to show you)...